

Fossils, Shells and Tools for sale - Categories


.jpg)
Collections - J.P Oliveira
Specialized in collection Seashells the World and Fossils of Portugal

Shells Topics - Preparation and Conservation
Over 30 years of Shlles collecting...
My fascination with shells was born more than 30 years ago, transforming me since then into a specialized collector, in inexhaustible hours of pleasure in the preparation and conservation of the shells, or simply in their cataloguing. The sea shells have been part of my life for a long time...
Search
Fossils of Portugal - For Sale

Shells Topics - Part one » Preparation and Conservation

Hermit Crab, inside a shell of the genus, (Murex). Phuket, Thailand, 2011
Introduction
In Shells Topics, I will approach the various questions related to Conchology. The Topic is divided in two parts. As a collector, I think it is important to share my knowledge with other collectors, or with people who are simply interested in learning some techniques on the subject of shell collecting. My objective with these topics is not make the role of a teacher, just to contribute to being another guide...
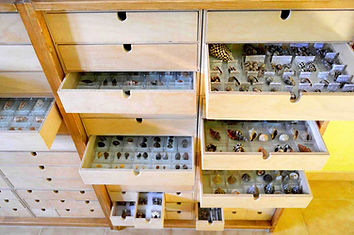
Collections - J.P. Oliveira
My Shell Collection
Part I - Preparation and Conservation » In the first part of the topic I explain some techniques and basic rules for cleaning and preserving shells. Exhibition of the collection and other tips...
Part II - Conchology and Classification » In the second part, I approach themes such as ordering a collection and the respective classification of shells. Some ideas about on shell collecting. Buying of collection shells. Falcifications and other themes...
Preparation and Preservation of Shells
As almost all Gastropods are composed of two distinct parts (hard and soft), to be able to do good preparation and preservation, it is necessary to have some understanding of the chemical and morphological composition of the specimens to be treated. It may seem complicated, but it's not...
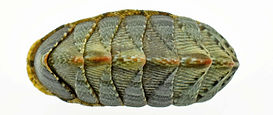
Rhysssoplax olivacea (Spengler, 1797). Portugal, Lourinhã. 2023

Mollusca » constitute a big phylum of invertebrate animals, Marine, Freshwater or Terrestrial. The living animal is constituted of a soft body, unsegmented and divided into three main parts, Head, Foot and Mantle, with an external or internal shell. In this main phylum of invertebrate animals appear the Gastropods and Bivalvia (the most popular), consisting of a soft body and in almost all families covered with an external shell. Cephalopods, whose soft body is covered by an external shell, or by an internal shell, in the case of Squid and Cuttlefish. Scaphopods, with an external shell in the form of an elephant's tooth. Polyplacophores, soft body, with an external shell and segmented by articulated plates, connected by a membrane.The structure (external/internal) of the animal is basically constituted of Calcium Carbonate and Conchiolin Protein. Calcium Carbonate is extracted directly from water (salt or fresh) and Conchiolin Protein is secreted by the animal (alive). At the extremity of the foot (in most marine Gastropods, rarer in terrestrial Gastropods), is coupled to the anatomical (hard) structure called Operculum, which functions as a protective trapdoor, enclosing the animal within the shell. Further ahead, I will explain how important it is to preserve this Operculum, in the shells (shells caught alive)...
Gastropod shell
"The gastropod shell is part of the body of a gastropod or snail, a kind of mollusc. The shell is an exoskeleton, which protects from predators, mechanical damage, and dehydration, but also serves for muscle attachment and calcium storage. Some gastropods appear shell-less (slugs) but may have a remnant within the mantle, or in some cases the shell is reduced such that the body cannot be retracted within it (semi-slug). Some snails also possess an operculum that seals the opening of the shell, known as the aperture, which provides further protection. The study of mollusc shells is known as conchology. The biological study of gastropods, and other molluscs in general, is malacology. Shell morphology terms vary by species group..."
Shell layers
"Main articles: mantle (mollusc), mollusc shell, and nacre
The gastropod shell has three major layers secreted by the mantle. The calcareous central layer, tracum, is typically made of calcium carbonate (CaCO3) precipitated into an organic matrix known as conchiolin. The outermost layer is the periostracum which is resistant to abrasion and provides most shell coloration. The body of the snail contacts the innermost smooth layer that may be composed of mother-of-pearl or shell nacre, a dense horizontally packed form of conchiolin, which is layered upon the periostracum as the snail grows..."
Source: wikipedia » Gastropod shell

The shell of a large land snail (probably Helix pomatia) with parts broken off to show the interior structure.
1 – umbilicus
2 – columellar plait
3 – aperture
4 – columella
5 – suture
6 – body whorl
7 – apex
Cleaning live captured shells - Part I » Preparation

Living shells of Clithon diadema (Récluz, 1841)
Living Shell Colleta
Shells caught alive are those that present the best preservation conditions and the more vivid colors, therefore more beautiful as collection specimens. I'm not going to give tips on how to get live shells, for obvious reasons... everyone is free to do what want, as long as preservation standards are respected and the laws of each country. I'll move on to the capture part and I'll just try to explain some of the processes of removing animal tissue, cleaning and preserving the shell. Cleaning shells can be a somewhat unpleasant process for most people. Depending on the situation, it can be a little dirty and very stinky... but necessary.
Acid substances
Some species of shells caught alive, have very intense color and shine (eg: genus, Cypraeidae), easy to destroy and hard to maintain... How shells, are basically constituted of Calcium Carbonate, anything used for remove animal tissue or in the cleaning of the general shell based on acidic substances, can be highly destructive. The acid dissolves the Calcium Carbonate and the bright part consisting of the Conchiolina Protein. In some more fragile or very bright species of shells, one should really avoid any genus of those substances. In the shells which is used the acidic substances (eg: Chlorus, Blach and others), they must always be diluted in fresh water, depending on the degree of acid force of the substance to be used. A bad step, it's a lost shell forever...

Several species of conus dipped into an acidic substanncia, diluted in water.

Many shell species can be consumed, such as oysters...

Extraction of animal tissue
Extraction of animal tissue
1 » Cook the live shells. The most used and easiest process to do for medium and small shells is to boil them (cook them) in water in a pan for a few minutes. The water must completely cover the shells. In this process, you should be attention that the shells should be dipped in room temperature water and boiled for just a few minutes, depending on the size of the shells. If you dive them directly in very hot water, a strong thermal shock is likely to occur and this could cause the shells to crack or even break... Once boiled, let them cool naturally.
* Once this step is complete, using long tweezers or any other appropriate tool, remove all animal tissue and use the operculum, if the shells have one. When you have removed all the animal tissue and if the shells do not have any limestone encrustations or others, wash them well under running water and leave them to dry naturally in the shade (never expose the shells to direct sun) or sunlight, irremediably destroys the vivid color of the shells. Later on, I will also explain how to remove the encrustations.
Note: This process of boiling (cooking) the shells is quite safe and one of the most practical to remove animal tissue. But depending on the shells (ex. Cypraeas and other very thin bark shells), it may not be the best option... nothing than written here or anywhere else, is to be followed religiously... whatever you do, one must follow the principle of reasonableness, weigh the effects and options...
2 » Freezing of live shells. This process is also widely used and relatively practical. This is a process that I only do very occasionally and I have some reservations about its effectiveness...freezing the shells means that they will be subject to significant pressure, resulting from the molecular expansion of ice formation inside the shell. The process, however calculated it may be, personally I wouldn't risk this practice on very fragile shells, not very rare... but I'll explain how it should be done.
The most practical is to put the shells in plastic bags (ziplock), with enough space to add water, so that they are completely covered. Put the bags in the freezer for a few days. After a few days of freezing, remove the bags and let them defrost naturally (do not use a microwave). The process for removing animal tissue is the same as described*.

Several shells in a plastic ziplock bag, ready to be frozen.

A mountain of Turbinella comorinensis prepared for final cleaning

Turbinella comorinensis, already properly prepared.
3 » Bury the Living or Dead shells. This process (kind of macabre and smelly...) is much less popular than the other two processes already described. I have also never used this technique to remove animal tissue. Done well, the results can be quite good. It is a widely used technique for large shells or for cleaning large quantities of them. The cleaning process is slower, since it has the help of insects and natural microorganisms to decompose the animal tissue. I've never done it, but I'll explain how it should be done correctly.
To start this process, choose a remote location. Remember the bad smell...
After choosing the local, open a hole in the ground, deep and wide enough to fit all the shells comfortably. At the bottom of the hole, you must place a straw layer, repeat this process between the layers of shells that you deposit there and a final layer of straw before covering everything with soil, or sand. The straw will allow the shells to be better packed and this will also allow insects to move more freely between the shells. To finish the process safely, put a metal screen over everything and secure it as best as possible (the screen will prevent any small animals from digging up the shells). Seal everything with a thin layer of soil (about 10cm), not much more than that. The shells should not be at too great depth, as this will further slow down the process of proliferation of insects and bacteria. Mark the location with markings that are easily recognized to prevent anyone from accidentally walking over the shells...
Note: Depending on the amount of shells and their size, this cleaning process may take some time (weeks or months). The shells must have their mouths facing upwards. This will make the insects' work easier and prevent the Opercula from falling and mixing with the soil and straw. I also don't recommend this process for very delicate or very rare shells...
These three animal tissue removal processes described here, are the most used by collectors around the world. There are other more or less effective techniques for the same purpose, but these are the most used and practical. I add here to the Topic a Fourth Process, mine. Which is quite effective and practical. But also, a little dirty and smelly...
When I travel, I almost always bring several shells that I catch alive. I rarely have the conditions and time to prepare these shells in the places I travel. What I do is keep these shells in plastic bags (Ziplock). It's not a good practice, but most of the time I don't have better solutions and no matter how many bags I stuff the shells into, the bad smell always passes... When I get home and start unpacking the shells, they are already in a severe state of decomposition and very, very smelly...

Littorina scabra (Linnaeus, 1758). Philippines, Palawan, 2007
As the shells are no longer alive, but still retain part of the animal tissue and I want to see the prepared shells quickly, I have to resort to another technique. Total immersion of the shell in water. This process causes the animal tissue to decompose more quickly and let go completely from inside the apex. It's not pleasant, but it's relatively quick and without risk of damaging the shells. The first step for this process is to wear gloves, a mask and have a strong stomach...

Lambis lambis (Linnaeus, 1758). Philippines. Palawan, El Nido. 2007
As the shells are no longer alive, but still retain part of the animal tissue and I want to see the prepared shells quickly, I have to resort to another technique. Total immersion of the shell in water. This process causes the animal tissue to decompose more quickly and let go completely from inside the apex. It's not pleasant, but it's relatively quick and without risk of damaging the shells. The first step for this process is to wear gloves, a mask and have a strong stomach...
As I always try to use the shell Operculum, I pre-wash them under running water carefully so as not to lose them, especially if they are very small. After that, I arrange several containers and depending on the shells that I have to prepare, I put the species separately from each other, to prevent the Operculum of different species from getting mixed up... depending on the speed of decomposition, I change the water in the shells to not become rotten, until the animal tissue can be removed easily. The process of removing animal tissue is the same as that already described*.
Note: In the process described, the Operculum inevitably come loose from the animal tissue and depending on the number of shells, most of the time I am no longer able to fit all of these Operculum into the original shells to which they belonged...but this, in my opinion, is not enough or nothing relevant depending on the species you are preparing, as the Operculum are lightly glued to the outermost part of the mouth junction. The main thing is for the Operculum to be placed in the respective shells of the species to which they belong.
The exception is for some species with the Calcareous Operculum. For these, it is necessary to be careful not to exchange them from the specimens to which they belong, since these Operculum have their own fitting (ex: genus Neritidae).
_book.jpg)
"Neritidae shells and their Calcareous Opercula; taken from the book The Cambridge Natural History (1895): 1. Nerita; 2, 3. Neritin; 4. Neritina, intermediate form (= Neritina granosa); 5, 6. Septaria." » wikipedia
Cleaning live captured shells - Part II » Preparation

Magnificent Murex nigrospinosus, cleaned and prepared for collection
Introduction
Having explained the part about removing animal tissue, now comes the part about removing hard and soft encrustations and the *Periostracum...
Hard encrustations (limestone, barnacles and other hard organisms). The process of cleaning these shells can be a little long and complicated to do, depending on the species you have to clean (ex: Murex genus).
Soft encrustations (animal tissue remains, algae, sponges, periostracum and other soft organisms). Cleaning soft encrustations is a much easier process to do. I'll start with the easiest part... soft encrustations.
Removal of soft encrustations by chemical process
To begin this process, it is advisable to wear older clothing, or an apron, gloves and protective glasses. The process of removing soft organisms is relatively simple to do. Depending on the shells and the encrustations they may or may not have, they should undergo chemical cleaning. Even if the shells do not visually show any trace of encrustations or other organisms, chlorine or bleach will act as a strong bactericide and germicide that will clean the shells completely. Mainly the small soft parts of the animal, which are usually difficult to remove manually from the bottom of the siphonal canal.
As already described in the Topic article, extreme care must be taken with all acidic substances to be used when cleaning shells. Mainly, in the most fragile species and in extremely smooth and shiny shells (ex: Cypraea).
In this process you can use (Chlorine powder), diluted in water, or simply use ordinary sanitary water (Bleach), without perfumes or detergents, and not very strong. Personally, I use Bleach. Both products have the same chemical principle (Sodium Hypochlorite). The first step is to find a plastic container (chlorine or bleach do not react with plastic), large enough to dip a few shells at a time or individually.

Chemical cleaning with chlorine (Sodium hypochlorite)
1 » Put the water until it fills half of the container and then add the Chlorine or Bleach, in a small amount. Never throw acidic substances before the water and never directly onto the shells.
2 » Using forceps or gloves, grab the shells through the opening and slowly immerse them so that the liquid penetrates all over the inside. If the shell floats, it means it is not completely filled with liquid.
3 » Observation of the chemical reaction on the shells.
Depending on the acceleration of the "acid boil", you can see whether the dilution is too strong or not. See how the internal and external organic matter of the shells is dissolving and depending on the process, add more Chlorine/Bleach to speed up the process, or water to slow it down. Don't try to do things too quickly...
Note: Cleaning time will depend on the size of the shells and the organic matter that needs to be dissolved by the acidic solution. The more organic material the shells contain, it is natural that the process will take longer, minutes or hours...
In the most sensitive shells, shells with the Periostracum and shell operculum, do not leave them in the acidic solution, along with the other shells. Immerse them for just a few seconds and then rinse them under running water. You can repeat this operation more than once depending on the result you want to obtain. When the shells are completely clean of all organic material, you can place them back in water (just water) for a few more hours, this process will release any trace of acidic solution. Remains of the acidic solution can remain inside the shells and harm their preservation, immersion in clean water eliminates these traces.
» Periostracum,
is a thin organic covering "skin" that many Gastropods and Bivalves have. This "skin" is extremely hard and velvety when the animal is alive. Many collectors today leave the Periostracum intact on shells, or at least on some by species. The Periostracum is easily removed by the acid solution. Since you don't want to remove it, the only inconvenience is the fact that in some species you cannot see the full beauty of the shells (the bright colors) and over time the Periostracum becomes brittle. In some shells that have more of the same species, it is worth leaving some with the Periostracum, for reasons of classification or scientific study...

"On this Conus leopardus, natural rubbing has eroded the periostracum in some parts of the shell." » "Distorsio muehlhaeusseri, an example of "hairy" gastropod." wikipedia
Cleaning live captured shells - Part III » Preparation

Turbo torquatus torquatus. Living shell with soft and hard incrustations. General appearance of the shell, after cleaning.
In most cases, with the removal of soft encrustations through a chemical process, a large part of the hard encrustations is also removed... most of the time, they simply come loose from the shell (limestone, barnacles and others), or a simple brushing is enough. with a hard bristle brush to resolve the total cleaning issue. The other encrustations that persist stubbornly clinging to the shells are those that we have to remove manually with some persistence and patience...
Removal of hard encrustations, by manual and mechanical process
In this shell cleaning process requires some technique and manual dexterity with tools. Mainly, when necessary or optional, to use mechanical equipment. In both cleaning processes, one must take into account the fact of taking the necessary care not to damage the shells irreparably. Any mechanical tool misused on the surface of the shells can be disastrous...
» Manual cleaning
When cleaning manually, tools can be used (ex: small screwdrivers, scalpels, needles of various sizes, brushes with stiff bristles and others). Almost anything can be converted, to carefully scrape and remove hard encrustations from the shells. Use the tools you find most appropriate to carefully remove all the encrustation that can be removed. This way, you can enjoy the total beauty of the shells and make better preservation of them. Do not go beyond what is rationally possible to do. Better a shell half-cleaned from encrustations, than a shell completely clean from encrustations, but irreparably damaged...
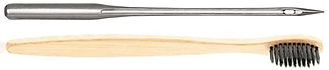
Most of the time, these two tools are the most versatile, for cleaning shells...

Mini-Drill - with flexible extension + fine emery stone tips.
» Mechanical Cleaning
Mechanical cleaning, it seems like something that sounds more "professional"... Personally, I rarely use this cleaning process on my shells. Not by the fact I don't know how to do this, or because I don't have mechanical tools for this purpose, but because I don't think it's necessary to use these tools on the shells. Unless, exceptionally in very exceptional cases... (ex: shells with a lot of hard limestone formation, or a lot of shells to clean...).
To do a good job of cleaning the shells mechanically, with some precision and safety, you can use the most popular and cheapest tool, Mini-Drill - with flexible extension. The flexible extension attached to the drill will allow greater precision and maneuverability in the work. To clean encrustations, use fine emery stone tips.
A more specialized mechanical tool that can do a job much more precision and quickly are Pneumatic Micro-Hammers, also known as (PEN). This type of tool works with compressed air and is generally more complex to work with. The price for these tools can often be more expensive than common Mini-Drills... Personally, I only work with these types of tools to clean fossils...

Pneumatic Micro-Hammers (PEN)
Attention: Some encrustations are practically impossible to remove (ex: tubular microstructures of worms and others). Generally, these incrustations are parasitic, they are so attached to the shell that they are impossible to remove without damaging it, whether through manual or mechanical processes...
I recommend taking extreme care when removing incrustations so as not to scratch the sensitive surface of some species of shells with very smooth bark, or break more delicate parts, such as the spines of shells of the Murex genus...
Note: After removing hard incrustations possible to be removed, there are generally remains of micro algae and other visible organisms that must also be removed... To carry out this process, you must again follow the chemical cleaning steps, already described ( if necessary). This time the immersion time for the shells should be shorter. In most cases, simply submerge the shells for a few seconds or minutes and rinse them again under running water.
Shell preservation
Regardless of the typology of collection that it has or wants to do, the preservation of shells is a basic and general rule of collecting. Even if you only have shells purchased from specialized sellers...
To have and maintain a well-preserved collection, it must be the constant target of collector's attention. Depending on the case, preservation must be done regularly, this will increase the beauty, quality and longevity of the shells. To make a good collection of shells, as a rule, it requires a lot of work and financial investment. However, it is very easy to lose all this work and investment, due to negligence or lack of knowledge...
» How to preserve shells
Once the entire shell preparation process has been completed in the order already described, the Preservation part follows. After the shells are subjected to the entire cleaning process, it is natural for them to become dehydrated, lose their natural shine and have an opaque and visually unattractive appearance. To get them back to their natural splendor, they need to be hydrated and until you give it some polish. Polishing may be a necessary process, especially in some species, or in shells collected dead...
» Materials used in this hydration stage
Mineral oil and a brush. The oil must be a good quality mineral (100% natural, without extra chemical additions), do not use vegetable oil. This is very important...
Bottle of Mineral Oil. Not to be confused with Mineral Spirit...
» The application method is simple
Application is done with a good quality soft brush, preferably round. To make the entire process easier, put some of the oil into a small, wide container, this way it is easier to insert the tip of the brush. Don't saturate the brush too much with the oil. The oil layer must be applied evenly over the shells, in a small amount. The objective is to hydrate the shells and not to soak them in oil...excess oil can be absorbed with soft and absorbent paper.
Once the process is complete, let the shells air dry on a cloth or paper, in the shade and without being subject to dust. As long as the shells are moist from the oil, any dust will stick to them and this can be an inconvenience and a big problem...
Note: Applying the oil is not recommended on shells that have a very enamelled surface, such as Cypraeas or Olivas and other similar species. The surface of these shells is highly enamelled does not allow for effective oil absorption. The best way to remove stains caused by washing and restore their natural shine may be to simply manually polish the shells with a soft cloth and that does not release hair. You can also apply a layer of liquid silicone to create a protective film on the shell (I've never done this process...). If some species are in a poor state of preservation, they can be polished with solid Paraffin.
» Preservation of the Periostracum
As already described here in the topic, it can be kept and preserved in shells. In some species, it is quite interesting and beautiful to preserve the Periostracum...
To preserve the Periostracum, you can make a mixture of Glycerin, diluted with 10% Alcohol. The application of this mixture to the Periostracum must be done with a soft brush and applied evenly. The process of preserving the Periostracum is more effective if it is fresh (shells caught alive), or has been moistened with water beforehand. The drying process is the same as already described above in the topic.

Periostracum treated with Glycerin, maintains its color and soft texture.

Byne's disease » "An affected gastropod shell (a juvenile Agathistoma) from a museum collection.". wikipedia
» Polishing with solid Paraffin
The paraffin polishing process (only applicable to shells with a smooth surface, ex: Cypraeas), is not always a method used by collectors to recover their shells. Even though this polishing process can solve some of the visible problems, such as stains or scratches and others. Particularly, in shells that have been affected by efflorescence of salts, known as Byne's disease. This terrible disease that affects shells and can completely ruin a collection. The disease manifests itself basically as small circular crystallized corrosions, or in appearance a thin layer of mold. In a short time, the infected shells have serious scars on the external surface, especially in some genus, such as Cypraeas, Olivas and other similar genus that are very enamelled. To minimize this and other problems in shells, polishing with paraffin can be part of the solution to resolve small aesthetic problems...
» The application method
To make the polish relatively small and medium shells with paraffin, in a simple and quick way, you can use a small felt disc, in a mini-drill, before applying the paraffin to the shells, apply a little oil mineral in them. With rotation at a midpoint of the mini-drill, press the disc against the solid paraffin base and then directly onto the shell, in smooth and transversal movements. It is likely that this process will have to be repeated several times, depending on the result you want, or that is possible to obtain... Finally, use a clean and dry cloth to remove any excess paraffin.

Felt disc impregnated with Paraffin for "Polishing" the shell.
Finally, the placement of the Operculum...
To finish the process of preparing and preserving the shells, it just remains to be concluded the placement of the operculum. Some collectors have the tendency to underestimate the importance of preserving or not the operculum... One might initially think that has no relevance in being preserved and placed in the shells...but, it does. More than just looking aesthetic, they are an important part of the shell they belong to. They often help to determine the family, genus and even species... Scientifically, their preservation is very interesting.
The process of placing the operculum is simple, but it should not be done in any way... the operculum must be placed in the correct position. When the animal tissue is removed from the shell, its original position must be observed and replaced in that same position. If you can no longer know its initial position, try searching and seeing photos of the animal alive, or already prepared shells of the same species...
» The process and materials used
White cotton, transparent glue and long tweezers. The glue should not be very strong. If the glue is very strong and there is a mistake when gluing some operculum in the correct position, this could be a problem in detaching them from the cotton... Personally, I use common paper glue (UHU - transparent). Depending on the size and opening of the shell, make a cotton ball large enough to fill the entire opening. Depending on the weight of the operculum, the necessary amount of cotton must be introduced into the shell, so that there is good support for the operculum. Then, apply a small amount of glue to the cotton (cotton only) and using tweezers, position and press the operculum into the correct position. Let the glue dry and apply a little mineral oil to the operculum.

A - Cotton fill
B - Glue on the cotton
C - Gluing the Operculum
D - Fully prepared shell, to be added to the collection
Note: do not glue the cotton or the operculum to the shell. During cleaning the shells, observe the position of the opercula. You can record this position with photos...

Fossils an Shells Topics » Fossils Topics

Preparation of three articulated vertebrae
Introduction
"The fossils in my collection (fossils from Portugal) were all discovered and prepared by me. I am not a professional expert in fossil preparation, but I have good sufficient knowledge to also venture into the area of preparation and conservation. Some time ago, I acquired specialized equipment for preparing fossils. They are expensive “toys”, but this puts the work of preparing the fossils on another level of speed and perfection, removing any remaining matrix to clean the fossils...."
Fossils an Shells Topics » Shells Topics
-02_edited.jpg)
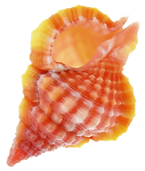
Fusiturris similis (Bivona, 1838). Seashells of Portugal
"In Shells Topics, will approach the various questions related to the Shells of the World. The Topic is divided into two parts. As a shells collector, preparator and hunter, I think it is important to share my knowledge with other collectors , or with other people who are simply interested in learning some techniques on the subject of shells collecting and preparation..."
NEWSLETTER: The 23th of July 2024, Portugal

Dear friends, collectors, or simply visitors. Once again I'm remodeling my website, in a final and possible format... When everything is totally remodeled, it will have an aspect much more pleasant and easier to navigate through the pages. Many and new content are being added. New pages. New photos with quality. The description of new Fossils and Shells. In the end it will almost be a new website...


